Structures
The first and easiest consideration in building your quadcopter should be the structures. In this project, I define structures as any hardware component that does not require an electrical input. On all quadcopters, this includes at least two things: The Frame, and the Propellors. We will also discuss Skids, though many quadcoptors are fine without them.
1. The Frame
When you decide to build your quadcopter, you should begin with a general idea of what you want to do with it when it's finished. The ideal size, weight, and material of the frame will depend heavily on what you plan on using it for. For example, for a racing quad you will probably want a strong, small and lightweight frame made of rigid material. For a quad with a camera mount, you'll need something much larger with a lot of mounting surfaces and a slightly more flexible material.

Frame Sizing
How is frame sized measured?
Great question! Quadcopter frames are measured "diagonally", from the motor center of one arm to the motor center of the other arm. This is a bit confusing in words, so observe Figure 1 below. This is a schematic of the Feiyu-Tech X4.
F330 Glass Fiber Mini Quadcopter Frame 330mm
[Hobbyking.com]

Schematic of the Feiyu-Tech X4 Quadcopter
[SingaHobby.com]
The 'Motor to Motor Diameter' on the left is the dimension that most frames will list as size. This diameter represents the distance between the center of two opposite ended motors. For example, a frame listing on a website will say something like, "Quad frame carbon fiber 500mm". That means the motor to motor diameter will be 500mm. Maximum propeller diameter is not usually listed unless you're buying a pre-built quad.
For a medium sized, easily assembled and sturdy frame, I would suggest a size of around 450mm. This will give you plenty of room to attach all your equipment, while still being decently manuverable. An important thing to remember is that the smaller you go, the less room you have to put all your stuff, and the larger you go the heavier and less manuverable you become.
Frame Material
What are quadcopter frames made of?
Another great question. You're on a roll buddy. Quadcopter frames are usually made of three materials:
-
Fiberglass/Glass Filled (+some sort of nylon usually)
-
Wood
I know I said three materials, but I thought wood deserved a shout-out. All I'll say about using wood for the frame is that I wouldn't recommend it. Wood has a low strength to volume ratio, and is more vulnerable to the elements. The other materials (Aluminum, Carbon-Fiber, and Fiberglass) all have their pros and cons, but lets figure out what traits we're looking for before moving on.
The Ideal Material
So what traits do we want for our frame?
Here's what an ideal material would look like:
The Ideal Material
Pros:
-
Inexpensive
-
Lightweight
-
Nonconductive
-
Dampening
-
Durable
Cons:
-
Too perfect
I'll explain. The first, Inexpensive, is an easy one. However, if money isn't an issue for you then I would suggest ordering a custom manufactured aerospace grade titanium frame. Then buy me a car.
Lightweight shouldn't be a surprise either. Obviously the heavier something is, the harder it is to make it fly.
Conductivity can occasionally cause issues when around electronics. Since most of the electronics will be mounted to a single frame, it's easy to short circuit something if the whole thing is conductive. Also, conductive materials commonly cause signal interference. These problems aren't a huge deal though, since they can be worked around with proper wiring.
Dampening is a material's ability to reduce vibration. Or at least that's how I'm going to use it here. Reducing vibration is important when it comes to Sensors, especially the accelerometer. I'll explain further in the Sensor's section, but what you need to know for now is that vibrations will create noise in your sensor signals. Vibrations come mainly from the motors, travel down the arms of the frame, then effect the sensors. If the arms of the frame can attenuate some of these vibrations, it will make the sensor readings more accurate.
Durability is the overall strength of the material. Obviously we need the frame to be strong enough to take a few tumbles.
Summarize
To summarize, we want a cheap, light, nonconductive material that is strong, but can bend a little bit.
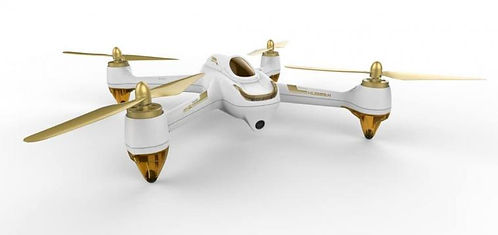
Hubsan 501S Brushless Quadcopter
[MonoPrice.com]

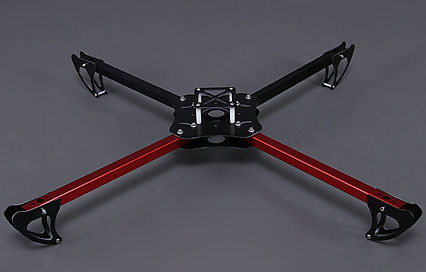
303 Drones Falcon Aluminum Frame
[303Drones.com]
Aluminum
Aluminum is a decent choice for a frame.
Pros:
-
Relatively Lightweight
-
Durable
-
Inexpensive
Cons:
-
High Conductivity
-
Intense Vibrations
-
Hurts a lot when it smacks you in the face
Aluminum frames are pretty common and are a reliable option. We'll just have to be extra careful with the wiring and sensor mounting. Sensors should always be mounted on some sort of dampening material, especially with a metal frame.
Fiberglass/Glass Filled
Fiberglass/Glass Filled is a good choice for a frame.
Pros:
-
Durable
-
Dampening
-
Inexpensive
-
Nonconductive
-
Fairly light
Cons:
-
Very hard to repair
When using glass fibers as a material, there are two ways to go about it. Fiberglass (or Glass Fiber) is an interweaving mesh of glass fibers to make a very strong, very light, and very thin carbonfiber-like material. Glass Filled is a mix of glass fibers with a material like nylon to make a thicker, plastic like material with reinforced strength. The interweiving mesh gives you a better strength to weight ratio, but most fiberglass frames will have a combination of both. Usually the base will be fiberglass, and the arms will be glass filled. This is because it is very hard to make a fiberglass section that isn't flat.

F14702 Wasp280 280mm Fiberglass Frame
[Aliexpress.com]

HobbyKing Totem Q330 glass filled nylon and fiberglass Frame
[HobbyKing.com]

Carbon Fiber
Carbon Fiber is a great choice for a frame
Pros:
-
Very Durable
-
Dampening
-
Very Light
Cons:
-
Conductive (Surprising, I know)
-
Expensive (Not surprising)
-
Sensor interference
Carbon Fiber is pretty much the holy grail of quadcopter material. Incredibly strong for it's weight, yet still perfectly flexible. Carbon Fiber is electrically conductive though, which might surprise you. It is also known to heavily block signal transmission, but this shouldn't be a problem unless you're planning on completely encompassing your electronics with it.
HK Talon Carbon Fiber Frame
[PyramidModels.com]
Conclusion:
When browsing for a frame you'll mostly see a lot of composite frames, where the base is some sort of fiber mesh material and the arms are a glass filled material. Most of these frames will work perfectly fine for all but the toughest impacts. Just remember to take these points into consideration when buying:
-
You need enough room to fit all your components on the frame, including ESCs, Microcontroller, Sensors, Battery and whatever extra you wanted to add.
-
Keep the weight of the frame in mind, as a heavier frame will take my power to lift.
-
You'll definitely crash more than a few times.
Happy browsing! Also, READ REVIEWS! They're super helpful.
A Note on Integrated PCB
Some frames will have an integrated PCB (Printed Circuit Board). This is to reduce the amount of wires you need to use and make assembly more organized. I won't get much into it, but if you know a good amount about circuits then a PCB is a plus. If not, then don't worry too much about it. You really don't need one.
2. Propellers
Propellers, like almost everything else on a quadcopter, have a lot more to them that you would think. Since propellers and motors go hand-in-hand, it's nearly impossible to talk about one without talking about the other. I'm going to have to bring propellers back up again when I talk about motors anyway, so here I am just going to explain the dynamics of quadcopter props, and generally what types of propellers we will be looking at. We will discuss specific propeller choices when we talk about motors.
Propeller Dynamics
Quadcopters are particular require a very specialized set of propellers. In this, I mean that you need to make sure you buy a set of four propellors: x2 Clockwise, and x2 Counter Clockwise.
Why do I need to have two Clockwise props and two Counter Clockwise props?
To conserve angular momentum. I'm going to try to explain this without delving too heavily in the physics of it, so if you aren't interested then just skip on to the next section. Once upon a time this guy named Newton got bored and decided to make laws for physics that we now have to abide by. One derivation of his laws is the conservation of momentum, and includes angular momentum. The conservation of angular momentum pretty much states that if something on a body starts spinning, then the body will experience an spinning force in the opposite direction in response. There are also some other weird moments and forces based on where the spinning object is located relative to the center of the body it's on, but we'll just ignore those for now.
When it comes to quadcopters, we have four props. If all four of those props were spinning clockwise, then you would have four counter clockwise spinning forces acting on the body in response. What you would get is a quadcopter that constantly spins counter clockwise. That would be weird.
Luckily, since we have an even number of propellers, we can just set two of them in the opposite direction and their moments will cancel out. That is, they will cancel out if we assume all the props are spinning at the same speed. I'll explain this in more detail in the software section.

Quadcopter Propellers
[Multicopter.kr]

Quadcopter Propeller orientation
[unmannedtech.co.uk]
To further explain the effects of propeller direction, I made the following beautiful figures. Each one shows a possible propeller configuration so we can observe the impact each has on the rotation of the frame.

Beautiful Fig. 1

Beautiful Fig. 2

Beautiful Fig. 3

Beautiful Fig. 4
Beautiful Fig. 1
This first figure shows what would happen if all props spun (spinned? span?) in the same direction. To balance the angular momentum of the motors, the frame would experience an overall spin in the opposite direction (red).
Beautiful Fig. 2
Fig. 2 shows a single motor with an opposite spin. This would result in the frame still spinning clockwise, but probably not as much. Also, you would probably have a slight forward/diagonal drift.
Beautiful Fig. 3
Remember those weird moments and forces I talked about earlier? The ones that depend on the spinning object's location relative to the center of the body it's on? In this configuration, the rotational moments would cancel out any rotation of the frame, but the offset of the motors would probably induce a forward drift. Each motor produces a reaction force aligned in the same direction down the center of the frame. So, even though this does not induce yaw, it is still not a stable setup. For the scope of this project, lets just simplify this and say that your quadcopter will explode if you use this configuration.
Beautiful Fig. 4
This one is just right. Since two are clockwise and two are counter clockwise, angular moments cancel out. And since the two top motors induce a forward motion, and the two bottom motors induce a backward motion, those cancel out as well. This configuration is stable.
Conclusion:
Make sure you buy two clockwise propellers and two counter clockwise propellers. Usually if a set says "quadcopter propellers", it automatically includes two of each. Also, make sure you assemble them like in Beautiful Fig 4.
Propeller Specifications
What do I look for when buying propellers?
I'll answer most of that question in this section, but until we talk about motors we'll have to leave this conversation a bit unfinished.
When you buy a propeller, you'll probably see some product names like:
Gemfan Propeller 6x4.5 Black (CW/CCW) (2pcs)
8045 SF Props 2pc CW 2 pc CCW Rotation (Green)
or something similar. Here I'll explain what these labels mean.
The numbers 6x4.5 or 8045 are the same things. The first number (6x4.5 and 8045) is the Length of the propeller. For the Gemfan 6x4.5 you have a Length of 6 inches and the 8045 SF has a Length of 8 inches.
The second number is the Pitch of the propeller (I'll explain later) in inches. The Gemfan and the SF both have a pitch of 4.5 inches. Another important spec you should look at will be the Hub Size, which is the diameter of center hole of the prop that connects it to the motor.
The three important specs that we'll look at to define our propellers.
I'll mention a notes on Material here so we can move on. When it comes to props, you pretty much have Carbon Fiber, Not Carbon Fiber, and Some Carbon Fiber. The obvious advantage to Carbon Fiber is strength. You should expect all of your blades to get damaged (yes even carbon fiber), so always buy some spares. The less obvious advantage is reduced vibration (which is good for your sensors). To be honest, you probobly won't notice the material of your prop so if you're on a budget don't worry about buying non-carbon. Moving on..
Length (Sometimes called Diameter)
The length, or diameter, of the prop is the end to end dimension. Observe Glorious Propeller Fig 1 below:
Glorious Propeller Fig 1: Prop Length (Diameter)
[Robotshop.com]
The propeller length for your particular quadcopter depends heavily on your motors so we'll talk about what you'll want to choose in the Motors section. Here is a list of pros and cons dependant on increased prop length:
Longer Propellers
Pros:
-
Greater efficiency at constant speed (not accelerating)
-
More stability
-
More lifting capacity
Cons:
-
Slower acceleration
-
High current draw
-
Hurts more when it smacks you in the face
The longer your blade is, the more theoretical thrust your quadcopter will be able to produce. This is because a longer blade will be able to displace more air, creating a larger difference in pressure and more lift. The downside to this is that your motors will be forced to use more current to spin a larger prop. The more air a propeller displaces, the more air that is resisting the motion. More current drawn from the motor means a shorter battery life, more capable ESCs and/or a larger battery.
A larger blade also has more weight, and therefore more momentum. With increased momentum your quadcopter will be able to resist small perturbations more easily. This is good for quadcopters that favor stability over speed, such as a camera mount quad. This is bad for acrobatic or speed quadcopters, since you would favor acceleration instead. Heavier props will cost more power to accelerate, so an acrobatic quadcopter will benefit from smaller lengths. Your goal is to optimize all of these factors for your particular needs to get the most out of every component.
I will say that the average length of props and the size you will most likely want,is between 8 and 10 inches for a 400-500mm frame. If you're planning on mounting a camera or something heavy you'll need to go larger, around 12 inches. If you're looking for a smaller acrobatic or mini quad, 6 inches should be fine.

Pitch (Sometimes called Pitch)
The Pitch of a propeller is defined by boatingmag.com as:
"The distance a propeller would move in one revolution if it were moving through a soft solid, like a screw through wood"
Kind of confusing, I know. An easier way to look at pitch is the angle of the blade. A higher pitch means the propeller blade is sharply angled, a low pitch means it's almost flat. Hopefully the picture below can help you visualize this.
But what does it mean?
To simplify, a propeller with a higher pitch will displace more air per
revolution. This, like everything in engineering, has its pros and cons:
A Higher the Pitch results in:
-
Slower acceleration
-
Decreased torque
-
Higher top speed
-
More current draw (shorter battery life)
-
Decreased stability
-
Increased Vibrations
I'll briefly the physics behind each point in this section. If you don't care
then move on to the next paragraph. The higher the pitch is, the more
fluid (air) it will displace per revolution. This means the motors have to
do more work to rotate the props, since they're moving more mass.
The resistance from the extra air they're moving will make it more difficult for the props to accelerate It also follows that the torque will be lower for a high pitch because of the relatively massive amount of air it must displace. The extra work forced on the motors to rotate the high pitch props will also draw more current, draining your battery life. The decreased stability and increased vibrations are both a result of the lowered torque, since each rotation will contribute more heavily to the motion of the quad.
Now, from all this data it seems like a high pitch propeller is a bad thing. This isn't entirely true, since "high" is just an arbitrary threshold. What you can take from this is that a higher pitch really only gives you a higher top speed at the cost of a lot of other things. The average pitches you'll see for quadcopter is around 3 to 5 inches.If you're building a racing or acrobatic quad, go for the higher pitch (4.7-5). If you're building a heavier quad for aerial photography or load lifting, go for the lower pitch (3.5-4). I would probably recommend a 4.5 inch pitch for 90% of quadcopters. It's the most common one you'll see and works great.
Diagram of PItch
[Fastonline.org]

Hub Size/Mounting Hole
The hub size is just something to keep in mind when buying your parts. When you buy a propeller, make sure your Hub diameter is the same size as your motor's shaft diameter. The normal range for sizes is around 3mm to 5mm.
What you might see a lot is an adapter set with your props, as seen in
the picture to the right. These just slip right in between the propeller
and the shaft, so you won't have to worry about getting the size right.
Does hub size make any performance difference?
No. Just make sure they fit your motor.
Hobbyking Thin E-Prop 10x5 with adapters
[HobbyKing.com]
Skids/Landing Gear
Do I need skids or landing gear?
The short answer is no. The long answer is also no, but there are exceptions. You don't need landing gear for a recreational or acrobatic quadcopter. You DO need a landing gear if you're mounting a camera gimbal under the quad, or you plan on landing in high grass or something.
Most frames will come with small elevated motor mounts, like the HobbyKing X550 shown on the left. These will be sufficient for 90% of the quadcopters.
There are a large varaiety in the types of landing gear/skids you can buy. Most will be made of Carbon Fiber, Glass Fiber, or some type of Plastic. You might find a few metal ones, but I wouldn't recommend the extra weight.
The common types of skids and landing gear you might look at are shown below. I'm not entirely sure how to classify them, so I'm going to make up my own names:
HobbyKing x550
[Hobbyking.com]

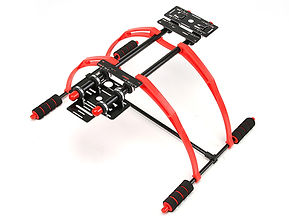
Extended Landing Skid Set SK450
[Hobbyking.com]
Lightweight FPV Landing Gear
[Hobbyking.com]

DJI Phantom Series Curved Landing Gear
[Hobbyking.com]
Extended Skids
Pros:
-
High Clearance
-
Wide Base
-
Low Material Volume
Cons:
-
Individually Weak Supports
-
Large Transportation Size
-
Looks like a spider
Full Landing Frame
Pros:
-
Interlocked Supports
-
Wide Base
Cons:
-
High Material Volume
-
Obstructed Clearance
-
Hard to land on uneven ground because of the middle support bar
Simple Landing Gear
Pros:
-
Compact
-
Small Landing Area
-
Low Material Volume
Cons:
-
Small Base
-
Low Clearance
Take your pick, they all have their pros and cons. The most important part is to make sure it connects to your frame. It's hard to say specifically how each one connects, since most frames and skids are either custom or specifically tailored for a single frame. Just make sure you read the specs and look into it a bit. In my opinion, you don't even need a landing gear. But go ahead and knock yourself out.
Assembly Materials
So lets say you bought all your parts; frame, motors, flight controlles, props ect. Everything comes in the mail and you can't wait to put it all together. Except you can't. You forgot about your assembly materials. Typical you. In this section, I'll tell you what you need to buy to make this all work. You didn't think you could just tape everything together, did you?
Materials you'll need:
-
Electrical Tape (Technically you could just tape everything together)
-
Plastic Zip Ties
-
16-18 AWG Hookup Wire
-
Gold-Plated Bullet Connectors
-
Heat Shrink Tubing
-
Break Away Pin Headers
-
DuPont Wires
-
Soldering Iron/Soldering Materials
These are the essentials that you'll need to make a socially acceptable quadcopter. In case you don't know what any of these are:
Hover your mouse over the pictures for descriptions.


Electrical Tape Zip Ties Hookup Wire Bullet Connectors
Pin Headers DuPont Wires Soldering Iron Heat Shrink


Just kidding. I don't know how to do that.
Electrical Tape
Electrical tape is excellent at doing tape things while at the same time being a great insulator. You'll be using this to secure components in place, tape down wires, and fix 90% of your mechanical issues.
Zip Ties
A handy alternative to tape, zip ties are great at holding down wires and components as well. They create less of a mess and are more weather resistant, but less versatile.
Hookup Wire
Hookup wire comes in a few different varieties. First, you have the size. Standard wire sizing is listed using the AWG Table. For our purposes, we'll probably be using the range of 16 to 18. We don't want it too small or it won't be able to carry enough current. We don't want it too big or it'll weight too much and be difficult to manipulate.
You'll also see options for stranded and solid. Stranded means the wire is made up of a lot of small wires twisted together. Solid means its one solid wire. In terms of performance the difference is negligable. A stranded wire bends a bit more easily while a solid wire is easier to solder and fit pins onto.
Gold-Plated Bullet Connectors
These are used to connect your battery to your other components.
Pin Headers
These are for your sensors and/or microcontroller. If you're building your own flight controller, you can welding these to your pcbs to make connecting wires a bit easier.
DuPont Wires
These are just wires that will let you easily connect your components without committing to soldering.
Soldering Iron
This is a soldering iron. You should know how to use one of these. If you don't, then learn off youtube. It's a necessity.
Shrink Wrap
Shrink wrap is important to protect wires from water and weather exposure. Make sure you shrink wrap your bullet connectors.
These are the basic materials you'll need for assembly. I'll explain how to assemble in the Assembly section.